Friday, December 13, 2013

Vote For Synthesizer of the Year 2013!


Now its time to vote for synthesizer of the year! Pick ONE of your favorite synthesizers that you thought was product of the year below. Poll closes January 5th, 2014.

[poll id="4"]

Wednesday, November 13, 2013

Quiz Your Synthesizer Vocabulary on Memrise

synthesizer_icon

To become a master synthesizer player or sound designer you must learn the lexicon that makes up sound. Take this online synthesizer course I made on Memrise:

http://www.memrise.com/course/176484/synthesizer-vocabulary/

There are 50 different terms that you can memorize. After you've really learned it over time you can apply your knowledge to almost any synth system.

Sunday, October 20, 2013

A Synthesizer Is Only Good If It Is Free And Open Source.


A synthesizer that cannot surpass itself in its operation oppresses the musician and music. Open source hardware, code, and 3rd party expansion systems, like Eurorack, are the only true way to progress and free the future for experimentation. Shareable software code and distributing schematics is the only way forward to freedom. Companies that do not allow the user to surpass function are holding the user back.

How many times, and how many years, have you waited for a company to update the firmware, only for them to release a brand new product?

It is true that you could buy a single module with many options and be happy with it. The notes and tones could be mathematically unlimited. However, it is still a static system that never changes, with a similar timbre. Its functions are always similar. The music making that comes from it will always take the same mechanical path.

Closed systems are Minimalist. Minimalism died when it could not free the user and take them to new heights. It held them back in a simple state that did not expand their thought. We dislike corporations that do not follow new ways of doing things and take risks. We dislike it when they keep secrets and only let them expand for a fee, and through them. Minimalism is for children. Minimalist, closed systems are a thing of the past.

When you create a project (like a new synthesizer) you are projecting your values and your lifeblood onto it. The only way to empower your user is to make a free and open system. It is time to revolutionize music again.

Sunday, September 29, 2013

Mac OS X Dolphin Speed Guide

waverace

If you are having trouble running Dolphin its possible that you need to tweak the many graphics settings. Here is a way to find out what increases speed, and what slows down your game. Make sure you have the Latest application build!

dolphin frame limit

1. First set the Frame Limit to 120

This will allow the game to run as fast as possible for testing purposes only. When we are done, we set it back to auto.

2. Options---->Graphics--->Show FPS

We need to know how many frames per second we are getting. It is also helpful to look at what % of game speed we are running. We will use this as a gauge.

3. Configure--->Audio--->DSP HLE Fast

Your system may not need this, but it helped mine. Setting DSP to HLE emulation (Fast) gave me a significant boost.

4. Run your game ISO and find a good spot to test the FPS. It should be running faster than normal. Wave Race was a good game to use. I also tried 1080 Snowboarding. Pausing the game may be convenient way to get a constant FPS.

5. Graphics---->Enhancements

Play with each setting. After you select it, the FPS or Game % speed should change. If it does not, put the setting back to how it was. If you see an increase in speed thats a good option to leave checked or unchecked.

6. Graphics---->Hacks

Do the same as you did above by checking each option. BUT also check for graphics glitches. If you see something very wrong put the setting back to how it was.

Here are settings I used on a Mac Mini. It may be different for different games or machines.  EFB Copies (x) Texture, Accuracy Fast, Disable Frame Buffer.  The rest was default.

7. Put Frames back to "Auto"  to put the game speed back to normal.

If everything went right, you should have gotten a 15%-50% speed increase, depending on the game. Not all games will run perfect still, but they may be playable now. You should try another game and check for graphics glitches.

Wednesday, September 18, 2013

Listen to Daft Punk Get Lucky On the Integra-7

This is a midi version of Daft Punk's Get lucky on the Integra-7 module. Motional Surround is on.

https://soundcloud.com/stealthgear/get-lucky-integra-7-midi-chip


Sunday, September 1, 2013

Roland Integra-7 Mini Review


The Integra-7 is a great module! Loaded with lots of legacy and new sounds. If you make techno or want to emulate an acoustic style this provides an all in one solution. I found myself liking this one from the get-go. Its not hard to learn or navigate. Most everything can be found within a few button presses or some rotation of the knobs. The sound is extremely high quality and will fill your musical needs for the most part. The reason to get this is that it will foster creative music writing. Scrolling through different voices will be inspiring.

There were some downsides to using it though. The volume knob isn't sensitive enough to use as an audio interface. Also the audio coming back from the computer had fake highs. It is like a sample conversion problem, or low bandwidth. So using this as your only audio interface is not a good idea, until they fix that. This one is best off as a straight module.

Pluses:

Good Electric Pianos, Guitars, And Strings

High Quality Effects

Motional Surround sounds realistic with the right settings

Most of the instruments are useable

Lots of sounds

The DAW plugin is fun

Works as an audio interface. You can even process sound from your computer with Motional Surround.

Cons:

Could use more inputs for surround mixing if you needed it.

Volume could be more gradual

Edit button could probably be closer to the shift button

Audio from computer was incorrect or buggy.


If you need a module, this is obviously the only one you may ever need. Sure there are cheesy sounds in here, most notably the brass, but overall I think I liked it. It has some decent digital basses too. It gets a solid A from me.

Friday, August 30, 2013

Logic Pro X Has USB Midi Problems


The latest version of Logic Pro X (10.0.2 / 10.0.3) has stuck midi note issues.

AVOID if you have any external midi gear and USB midi. Its a nightmare. The 10.0.2 update said it fixed some problems, but they are still there. Triggering notes in a completely different program solved my problem. It doesn't stick the note everytime, but once it does, you end up rebooting everything.

Saturday, August 24, 2013

20 of My Favorite Console Video Games of All Time


1. Streets of Rage 2

Favorite Moments: Using the lead pipe to smash enemies on the first level. Walking through the amusement park which had an amazing roto-scoping type foreground. I played the music in the menus over and over, including recording it to my cassette tape. This is the only game I've beaten twice in a row, back to back in the same day. This was the first stereo playback I've heard in a video game. The game sprites were so colorful and large for a home system, and the characters were instantly responsive on the genesis pad.


2. Sonic 2

Favorite Moments:  Rolling through Chemical Zone to see how fast my genesis processor was. Seeing "3d" rendered trees in Hill Top zone.


3. Sonic 1

Favorite moments: Beating the game in front of a bunch of kids with all the emeralds collected. Taking my Sega Genesis to church at night and playing it in the kids room, just so I didn't get bored. The realization that I could control the light on the TV screen warped my mind forever.


4. Road Rash 2

Favorite Moment: Jumping off the Hawaii track's biggest incline. The sound your guy makes when you run into a cow. Oh--eee--yaaaa. Playing it on a halloween night on a Friday while eating Snickers and drinking coke. I played the first level repeatedly in order to get the best motorcycle early in the game.


5. SSX 3

Favorite Moments: Being able to snowboard for 30 minutes downhill. Listening to the music and actually liking the load menus. Jumping so high I felt free from anything, just like real life snowboarding. "High Flyin' Supermodel!"


6. Resident Evil 4/5

Favorite moment: Defeating 2 chainsaw guys on the oil level. Having a teammate play my favorite game w/ me online. Beating the game multiple times and exploring all the content that was beautifully crafted. In RE4 I think I was being attacked by invisible enemies, but I had no idea what was going on, I just got out of there. These might be the best games of all time, but I don't attach as much sentimental value, beyond beating them both in a weekend and falling over.


7. Timesplitters 2/3

Favorite Moments: Creating levels and sharing them with people online. Making a Terminator 2 cyberdyne story level. I can never delete this off my memory card because there is no backup. The Cyberpunk levels were the best. Endless good times on this one. Another game I beat multiple times. Usually I never replay a game.

8. Goldeneye 64


Favorite moments: Using the moonraker laser gun on my siblings and cracking up.
9. Soul Calibur 2


Favorite moments: Playing this with my family. We were actually standing up it was so exciting. Playing the random dungeons.


10. Devil May Cry 3: Special Edition

Favorite Moments: Jumping on top of the worm boss and holding on as long as I could. This game may not have much sentimental value for me, BUT it really is one of the best games ever made. If you like God of War and realize it needed guns, hey they already made this series years earlier. Its basically as good as Castlevania.


11. Wip3out

Favorite Moments: I really did want to be Dade Murphy in hackers. When I found out it was a real game, and not just a dream, I was amazed. Getting gold on every board, including the ultra fast tracks. I had every control timed and memorized. At school I felt like my reaction time for everything I did had increased. I played this on a PSone small console that fit in my backpack front pocket. It made me feel really happy to have this.


12. Metal Gear solid 1

Favorite moments: Meeting Meryl. Psychomantis loading my memory card and commenting on how I played some soccer game I rented. Avoiding Sniper Wolf. Talking about this game with a new friend I had made. At the time  I really loved it and I needed them.
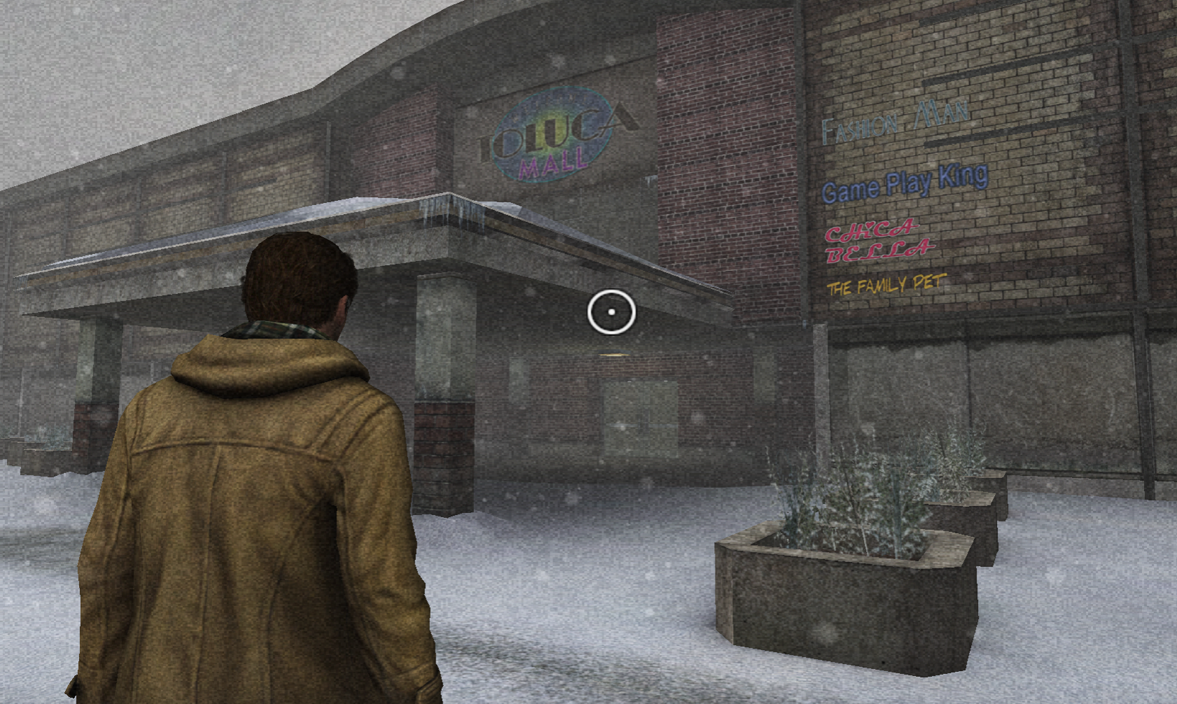
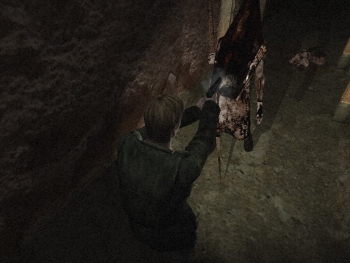


13. Silent Hill 2

Favorite moments: Being so scared I could hardly play the Hospital level. Realizing how bad Pyramid head was in his first scene. Yes that's his name if you actually played this game. This game is the reason we had ten years of gross looking, drab colored games.


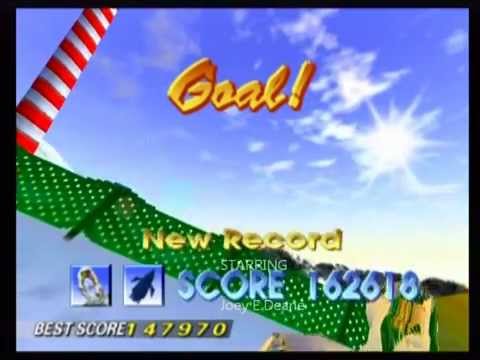
14. 1080 Snowboarding

Favorite moments: Remembering my high scores for the half pipe and emailing my brother the score.


15. Ocarina of Time

Favorite moments: Playing my first adventure / rpg fantasy style game and collecting items. Sneaking by the weird zombie guys in the courtyard.


16. Silent Hill Shattered Memories

Favorite moments: Using the wii-mote as a cell phone camera so I don't have to remember things, just like real life. The level of immersion really went to back of my brain. My game created an amazing story for me the first time. This game knows what game is the most basic level, it knows what real life is, and it knows how my brain is affected by raw experience.


17. Burnout 3

Favorite moments: Driving the F1 car while I was home, sick with a fever. Hallucinating about Liv Tyler.


18. Mega Bomberman:

Favorite moment: The undersea levels, and coming back later beating it as an adult. You have to do some serious psych-out and memorization to beat the final boss.


19. Earthworm Jim 2

(no screen shot needed!)

20. Super Mario 3

Favorite moments: Everyone has the same story with this game. Sitting on the carpet indian style and playing it on a dial TV in the basement. I did that at everyone's house.

Special mentions...Turok, Mickey Castle of illusion (the first game I ever rented from Blockbuster), MK1, Battlefront 1/2, Goldenaxe...and more I couldn't list. I'm going to link my favorite music tracks for these games in a new article.

There were also lots of times in the summer where I was with my friends, and we rented N64 carts and loaded up on Pepsi (I don't even drink caffiene anymore). Endless MK1 tournaments at birthdays and the like. They were not the best games of all time, but good times none the least.

Tuesday, August 20, 2013

How to Search For Real World Audio Interface Tests

If you search the model of an audio interface like "konnekt 6" + "rightmark" in google,  data pages will be in the results. They usually are titled Right Mark Audio Analyzer or something and may be foreign like this. You may not be able to read the page, but with google translate you'll be able to decipher it. What is interesting is that tests generated from this program are published all over the web. Chances are you can use this data to compare different audio interfaces. Things that matter like THD % spec (lower is better) and crosstalk graph give a good idea of audio quality. Items like dynamic range have DB values where higher is better. If you see the frequency response fall off too early, maybe avoid that interface!


Search for some cheaper or older firewire models. It is pretty amazing. M-audio does make interfaces with very good spec. Motu's entire line also is very good.  TC Electronic is very good. You may not need to spend $1000 to get a good signal.

Tuesday, August 13, 2013

Most Audio Companies Are Crap (A List)

Most of the stuff you see in the catalogs is total crap.


1. Designing to consumer expectations and not pro needs (budget studio monitors)

2. They don't update drivers or test on new OSes

3. They don't test their products with experienced people

4. They care more about their reputation than manufacturing quality

5. They make products for right now, but not the future

6. The products just don't sound right

7. They don't sound good enough

8. Too much latency in digital products

9. Too much coloring or distortion

10. Artificial bass boosting

11. Flawed designs ("Audiophile" & esoteric materials), No technical specs listed.

12. Not made in the USA

13. Copied designs. Nothing original.

14. Overpriced, waste of money

15. Creating a control interface, then making the home computer do all the work.

16. No ergonomics

17. Not enough raw power for productions

18. Retro and backward thinking products.

19. Marketing hype

20. Fake sponsorships and fake reviews.

21. "Mini" versions of products that are missing important things.


The only companies I like and have kept around after tons of trades: Roland keyboards. My isoAcoustic stands are a keeper. Things I'd Rebuy: the Future Retro Revolution. Marshall pedals. All the monitors, audio interfaces, mics and low end midi controllers are just total garbage and I have sold them to unfortunate people. As far as software value goes: Reason. I also think Waves plugins are great. TAL Plugins are great. I even find free plugins that outperform commercial ones a lot! I'm really sick of the junk! I should not have to pay extra for something that will last me 5 years. What kind of goals are these companies aiming for? Its obviously not quality, professional specs, and ease of use. I'm not going to join their cult of retards that buy their junk, nor am I going to pay as much as a used car for something thats almost solid state. Most of it is a drag and barely tickles my creativity.

P.S. Almost anything "mastering quality" or "analog" is hype. Digital is better in most cases. $5,000 for an EQ or Limiter? I would never let a hardware mastering facility touch my digital music because it will only add distortion and noise and lower the dynamic range. The only exception, where analog is good, are sound sources, like the synthesizer, microphone, and hardware distortion. You don't need to record on tape though. When you get real monitors, not 6" pieces of junk, you will notice how bad most people's idea of "warm" analog sounds. It takes a certain type of recording experience to nail that sound artistically, and its rarely heard anymore.

Saturday, July 20, 2013

A Sound Comparison Of Synths 2013 (updated)

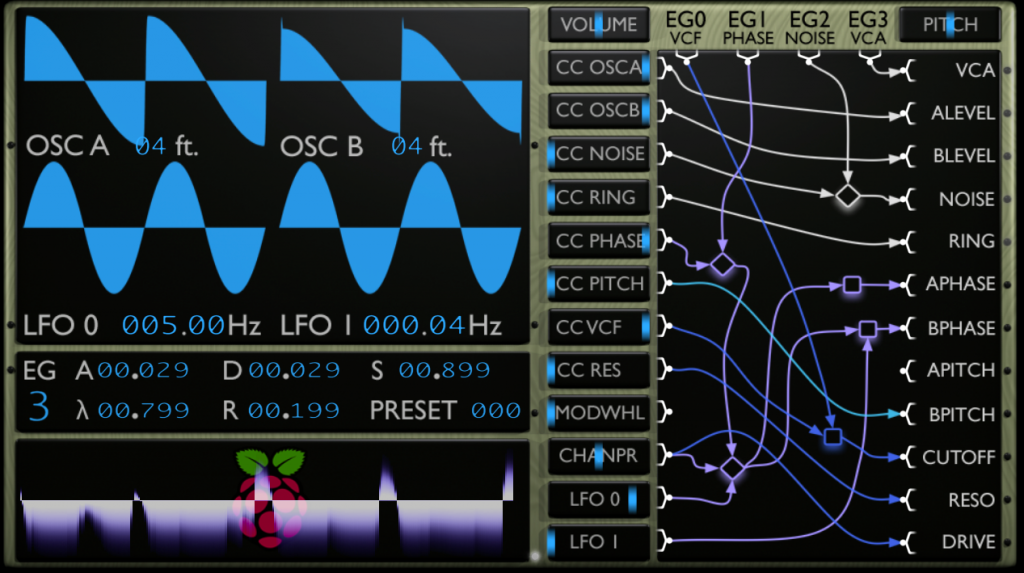
Based on sound demos, I've compiled a list of the best sounding synthesizers available. This is based on sound quality and availability. There are some really good analogue synths that should not be ignored. Arturia has some nice sounds. The Aturia Minibrute is an interesting synth with great sounds. The Arturia Origin is a very high quality synth. I like Analogue Solutions gear. As you can see most of the digital synths really don't "pop" out of the speaker with a unique voice or have that same emotion. An exception is with Arturia. But Many sound terrible. As you can see I don't like the Virus TI sound. Why they haven't figured out how to do a nice digital sound, I'll never know.

These were demoed on very good speakers (Behringer B1031a). If you'd like to hear these you should look them up on Soundcloud or YT. One bias I have is that I don't find hard distortion or muddiness agreeable. Stick with Korg Analogs or Arturia.


Recommended:

Arturia Minibrute

Arturia Origin

Korg Volca BassKorg

Korg MS-20 Mini


Analogue Solutions (all)

Not recommended:

Moog Sub Phatty

DSI

Moog Little Phatty

Virus TI

MicroKorg

MiniNova

UltraNova

Moog Minitaur

King Korg

Jupiter-50/80 (synth engine sucked, Supernatural was great)

Gaia Sh-01

Casio XW-P1

DSI Prophet 12

Elektron Analog 4

Vermona Perfourmer

Nord Lead 4

Waldorf Blofeld

Tom Oberheim SEM


Friday, July 19, 2013

Logic Pro X Review - Just OK

logic

Logic X or Logic Ten has been released. Is it any good? I'd say its a mild upgrade. The interface has become larger to support higher resolution monitors. Everything is a little bit more clear. But some of the same niggles are still here and its past is still present.

The library window now opens on the left side. The library window still does not list 3rd party Audio Instruments! It is confusing for newbies. They dont show up in the "Library."

options

The options for the tracks now cover up the entire mini-mixer view when opened. A bad choice. Most of the stuff in those menus nobody ever uses however. They should have gotten rid of those options.

The track view is nicer and easier to read. The actual tracks aren't bad either. Everything is more like Final Cut or Garage Band. Top buttons have been redesigned and make more sense. Whoever was working on Logic X knew that the older versions weren't very clear as to their function. The redesigned icons are good.

The score and piano roll are easier to read and access.

Preference panes are still pretty over your head or too similar to the old versions.

I believe Logic Pro X is mostly a better interface lift which will make it easier to use. They are headed in the right direction, but it still needs some work. I've never been a fan of their Library view. It really is straight out of the iPod 2004 or something. Reading all that text and not having access to everything is confusing.

Depending on your setup, things like latency and power will always be a concern within the computer. I preferred Presonus' easy setup which covered latency a lot better than Logic Audio ever has.

Logic Pro X is not bad. I'll continue to use it occasionally.  The stock plugins still have a bad sound so its not a good tool out of the box. I'd recommend a different program if you start your projects from the ground up in a self contained program.

Tuesday, July 16, 2013

Using Reference Levels Essential For Translation


One reason your sounds didn't translate to other systems is because you aren't monitoring at the right reference level. The reference level is a peak SPL in the real world and not a thing on a meter. Some say it is 83db. I don't believe this is a good volume level to use as it could damage your hearing. Some use 72db for nearfield applications. You will need an actual SPL meter from radio shack or the internet and a pink noise generator to set it. Don't go so high you are messing up your ears.


With a peak level set, you will mix sounds set below the reference level. Most people do -12 or -14db below. This is a standard comfort zone for voice or most instruments. If you want to go loud you can push over that level, but its not something you do through the entire mix. Someone should have told this to the people that mix Disney soundtracks.

Equipment like T.C. Electronic BMC-2 allows you you to have a set reference level at the touch of a button.

If you use flat monitors, the mix reference level is even more important to have. I find flat monitors are easier to mix with when pushed louder. If you mix at low volumes there is a risk of over-compression, distortion, and going too far. If you back off on the meter, and increase your speaker volume you'll be able to make better sounds. If you want to be more accurate, try a set reference level with an SPL meter.

Thursday, June 27, 2013

Using Aiwa Q Sound Boombox as an Effects Processor

R-702185-1346160812-9586

Aiwa Boombox (CA-DW480) has "QSound" onboard. It makes reverb, delays and hard panned sounds seem to appear outside of the speaker box, and bring them forward. This model boombox has RCA inputs (Aux) and headphone (mini jack output). The Qsound processor also affects the headphone jack. That means you can use Qsound as a musical effect! Your sounds and mixes will have a gigantic, impossible soundstage that uses psychoacoustics.

This is a low-fidelity hack, sort of like a bargain plugin. Apparently there are different types of Qsound and encoders. This one says "Virtual Stereo." It is one of the better 3d expansion effects I've heard.

In the early 90s it seems that Madonna and other artists had their music specifically encoded for Qsound. But I'd say the 3d effect works on a lot of content, sort of like Dolby Prologic will, but only with 2 speakers.

I'm not sure they meant for the headphone jack to output Qsound, but this could be useful for someone who likes to experiment. If you find the encoding software you could mix for the Qsound, then "print" the output from the headphone jack. People without QSound should be able to hear what you did.

Calibrating Speakers Limits Their Performance


If you are using Room Control or Room EQs you are not getting the most performance out of your speakers/monitors. In theory calibration sets your monitors closer to a certain specification. This only works in one point of the room. Calibration limits the peak performance in all the other areas of the room. Your speaker's natural performance capabilities are also tapered. This is similar to when setting your color TV to "what looks the best" (peak performance) instead of setting it to neutral color balance (calibrated). If you want your speakers to sound the best, set them by ear. I do not believe in calibration any longer. Its not useful for mixing.

The only pros to calibration is that everything will seem smoother. This is great for playback in a bad room. It may help intelligibility somewhat. But you do lose the "wow" factor from your system, which might have been why you bought it in the first place.

Color TV also looks different at different brightness or gamma. The same goes for speakers. They will sound different at different volume levels...so the moral of the story is to set the controls to what you like for peak performance. Most of the time calibration always hit the mark anyway. When creating we want to see and hear as much information as we can, and for some people that might be turning Room EQs off, or just bumping up the bass for awhile. You can use your own judgement and experiment with what works.

Monday, June 10, 2013

Dubstep Drums Effects Processing Tutorial.

This is a pretty good dubstep drums effects processing tutorial from Audio Tuts. This is for Ableton but the basics apply to other environments and EDM genres.


To sum up what he does in this video:

1. Layer 3 different snares.

2. Layer a clicky, short bass with a subby bass (longer sine wave), then shortens the audio overall length.

3. Add a variety of real hi-hat sounds (stereo) in between the main rhythm. You could use toms, shakers, or any sound.

4. Add a high pass filter on the hi-hats bus / group.

5. Low Pass filter the kick drums very low for headroom. Add a "smiley" EQ curve for less midrange.

6. Add a Compressor with slow attack & release (200-300ms) to kicks, which preserves the attack. 3:1 or 1:5 ratio? -2db Gain Reduction? Adds a notch for the snare, and a slightly smiley eq.

7. Add a parametric EQs to the snares, sweep to where it sounds the best and boost. Add a low pass filter & mid dip. Add a compressor again.

8. Remember to save.

9. Variates the rhythm again. Adjust fader levels.

10. Puts reverb on the snares with a hi-pass.

11. Optional: Use gates to adjust the tail end of the sounds

12. Add any types of effects you like. There are no rules.


Sunday, June 9, 2013

Drum Machine Samples - Links To Download


Here are some links to Drum Machine & Drum Samples. I'm keeping these as bookmarks for the future.

http://modularsamples.com Synth Drums

A cool sample pack: http://www.hexawe.net/mess/200.Drum.Machines/
now a 330+mb zipfile

A huge archive! http://samples.kb6.de/downloads.php

Goldbaby: http://www.goldbaby.co.nz/freestuff.html 
collections of freestuff from one of the nets best sample groups.

Netboy, a very old site I've talked about before! http://gamelay.usami.com/~netboy/w30/samples/


Some more kits: http://www.rhythm-lab.com/category/drumkit - drumkits page

Monday, June 3, 2013

My Current Mastering Chain

masteringchain


Here is an overview of my current output chain. I'm keeping it here so I don't forget!

1. Ozone Imager

I use this to make the mix brighter and give it a wider soundstage. This plugin can change dynamics so I don't do too much.

2. SSLCompressor

This plugin is like an auto-volume for me. It gives some movement to the sound that I like.

3. L3 LL Multi-maximizer

I have a custom mastering setting that I use for this. It also helps me keep the band balance in check. The limiting gives me a boost. This plugin is very useful. Ultimately, I end up editing my settings.

4. PSP Vintage Warmer

I like the way this sounds post limiter. If I am doing a lot of limiting, this can give something back into the mix.

5. H-Compressor.

I use this as parallel compression at 40% wet. It brings out some of the reverb / noise.

6. Space Designer.

I use IR files to check to see if the bass end of my mix is interfering with my mids. I check to see if things are intelligible in a large or boomy space that I don't have access to in the real world.

7. TT Dynamic Range Meter

I check the clipping on this one and also to make sure I didn't lost much dynamic range. If I lost more than 5db range though my mastering chain, I better go back and check the settings.

I also take this time to make sure things sound okay on my PC stereo speakers. I have them pushed together like a mono set. They do not have tweeters and are small enough to check the midrange.

Saturday, June 1, 2013

Club Simulation In A Plugin

clubsim_b

With Interrupt.ch's IR files, you can simulate a club and check your final mixes on that system virtually.

This comes with preset files for Voxengo Pristine Space but you can load the Audio files into Logic's Space Designer and any IR plugin. Set your mix to 100% wet.

Downsides are that this method does not simulate certain distortions and other dynamics. But I find its a better technique than using a pure simulator plugin like TB_Isone.

One thing you might want to do is monitor this in mono. You are probably supposed to use headphones, but I think its not asbolutely necessary.

Wednesday, May 29, 2013

Using Parallel Compression For Mastering

A parallel compressor brings out the quiet parts in the mix just like regular compressor. But what is the difference between parallel and normal compression? A parallel compressor can work without limiting the peaks or transients artificially. You adjust the ratio of quiet sounds to loud ones and retain all dynamics. How it works is by mixing Dry & Wet signals to taste.

compressionexplained

First of all what is compression?

Compression can make all sounds in the mix the same volume. It does this by reducing the signal when it goes past certain threshold (the threshold control).

- A low threshold compresses everything.

- The highest threshold compresses nothing.

The ratio you set the plugin also determines if the signal is compresses or not. It controls the amount of gain reduction directly.

- A low ratio, or 1:1 compresses nothing.

- The higher you set the ratio, 2:1, 4:1, or infinity, the more gain reduction you get.

- The attack and decay controls only adjust timing of when compression happens. Not the loudness of the signal. Long attacks delay the compression from happening. Short decays turn it off quick when the signal leaves the threshold area. Long decays keep the compression on for longer.

Tips:

- We may not realize that compression doesn't make the signal loud. Its job is to reduce it.

- Gain / Output controls may give us the false sense that compression itself is making things things loud after the fact. After the gain reduction, we usually boost the signal back to normal levels.

- With Parallel compression, one of the signals can be totally compressed. Notice how my threshold settings above have are set to compress the entire signal.

- You can use Parallel compression as the final effect in the chain. I have it post eq, exciter, and multi-band-limiter.

Paralell Compression:

If you mix a totally compressed signal back in with the original, you get a louder, airy sound that is not crunchy from normal compression or  hard limiting. We are controlling the ratio of loud sounds to quiet ones. Gone are the typical artifacts or distortion from typical compression plugins. Both signals must be synced properly however, so the wave forms lay over eachother perfectly. Its probably best to use a single plugin than doing it yourself. A plugin with Wet / Dry controls will achieve the desired effect. Try it on your master bus.

Another Tip: You should manually ride the faders afterward.

If you've reached the end you'll have a perfectly cooked burrito, ready for an on-the-go lifestyle.

Monday, May 27, 2013

F-MDRIVE 2612 VSTi: Out Now!

fmdrivebig1


With F-MDrive can design a vast range of sounds on top of 33000music instruments presets already available from Games VGMs. Out now! Windows 32-bit only (darn).

It looks like 8Bite PSG, a Master System sound engine is also coming soon

Wednesday, May 22, 2013

Tips for Mixing at Low Volumes


1. Turn of RMC or ARC (if your system uses it)

At very low volumes you aren't exciting the room modes much. Leaving it on will lose bass and detail. If you are mixing at a medium level, maybe turn it on.

2. Boost LF (Bass) and HF (Treble) if your speakers or controller have it.

At low volume we can't hear bass or treble as well as midranges. Turn it up! This may seem wrong when using a high end monitor thats supposed to cover your butt, but it works. Hopefully there is just a switch. Going behind the monitor is a waste of time.

3. Use Solo. (mono)

Monitor in mono and hear the mix.

4. Listen to every instrument for clarity.

What is intelligible and what is not becomes apparent at lower volumes. At higher volume it can be too easy to hear everything. Not everyone listens to music loud.

5. Try different size speakers.

8" speakers or midfields radiate big at any volume. A different size could allow the low end to be more apparent at lower volumes. Make sure they are at ear level. A different brand may translate better at low volume than others as well.

Protect your ears!

Multiband Limiting To A Loudness Curve & NS10s

multiband

This is a mini tutorial that will attempt to explain the fletcher-munson loudness curve to get a better sounding mix.

Things you should know before we start:

1. Human hearing is not flat. Our monitoring system may be flat, but our ears aren't. The human ear canal resonates around 3k. We perceive sound between 1k and 5k as louder than it really is. Sound in this range can become painful when we turn our speakers up. This is the same range that guitars are played in.

Already knowing this will help us get better mix translation. We know not to boost sound in this area too much.

2. Humans have trouble hearing at extreme ends of the spectrum (at low volume) We can't hear treble past 10k as well as we think. We can't hear bass as well as we think either. We like to boost our stereo. BUT....

3. How we perceive sound changes at different volumes.


The large upward bass curve represents what we can't hear well. The lowest sections on the curve is what "sticks out" to us. The louder music gets (higher up on the graph), the better we can hear bass. The curve gets flatter.

If your music is meant to be played on a club system or stadium, it doesn't need as much bass boost as you'd think. Notice the top curves are flatter. That means we have no trouble hearing it. Mixing on a flatter curve could encourage the listener to crank up your music, if you desire that. Also remember that people have EQ'd their sound systems themselves. This adds a monkey wrench to the situation. Since we can't know or rely on these different systems its up to the mix engineer to use the loudness curve (and consider dynamic range).

Now on to the multiband limiter.

Limiters allow you to change audio gain for custom bands. (Top graphic). Before limiting, You may want to decrease 2k to 6k bands by as much as 10db. This can be done with the gain knob. You can also increase the bass & treble range. Since I want to play my music loud, I might only boost bass by 3.5db. However if my bass kick is already loud I will leave it alone. At this point I'm not trying to get a competitively loud mix. Adjusting the mixer is probably better than using the multiband limiter, but we may not have access to that when we master! When I'm done making the mix sound right by approximating my loudness curve, I can try limiting with the main slider (makes the entire signal louder).

Now you should have a better mix!

Why do I use a multi-band limiter instead of EQ? The ones I use don't color my mix like many EQs. They have easy band controls. I can solo each EQ zone I set up. That helps me hear whats going on seperately. Later on, the compression & limiting function can help me shape the bass and the entire mix. I'm killing three birds with one stone. One plugin to mix to the loudness curve. One plugin to compress my bass peaks. One plugin to brickwall limit my volume.


The Yamaha NS10

The reason that Yamaha NS-10 speaker  translates so well is because they have just the right frequency bump in the 1k to 5k range where we can hear just fine alerady. Its a forwardness you don't want to hear at high volume because it causes pain. As a flat playback system the NS-10 is a failure, but when mixing, the exaggerated nature of this range makes a good tool.

Don't have NS10s? Just do the opposite of this tutorial. Bump the 1k to 5k frequency range by 8-10db instead of decreasing it. Ajdust your mix. Just remember to bypass it when you are done mixing!

So why did I bother getting a flat monitoring system? 

1. Good for playback at higher volume. Great for movies & video games.

2. Mixing & mastering at medium to high volumes.

3. The flat response serves purely as mental reference. No second guessing as to what it might be.

So with this knowledge we know that mixing at low volumes could lead to error. However if we add some EQ or loudness on our playback system, we can compensate a little. Even knowing this, the end results should always be checked on a flat system at a higher volume. The multi band limiter's single band gain control might be the right tool to get you there.

Why does Tron 2's soundtrack sound like a loud piece of junk? Perhaps it was mastered at lower volume, on a small system. This caused over compensation. Or perhaps they know not everyone turns up the volume on their junky home DVD system.

Sunday, May 12, 2013

Blogs: Audio Software Out In The Open

hacks-behind-cracking-part-1-bypass-software-registration.300x140

Most people would think torrenting is the best way to find software. Torrent sites have come and gone. Heavily policing and attention caused some of them to disappear. These are no longer the preferred method of distribution for some obvious reasons. Right now the best method is out in the open. Google searches, blogs and 3rd party download services are more annoying for copyright holders to haggle and more convenient for people doing the distribution. It is also more convenient for those downloading because it does not require extra software.

Chances are you can get an archive of the needed VST or AU plugin by a simple google search. Search the title, format, and platform  and you'll usually find a download page on a blog. Sites like audioz.info and proaudiozone.info link to all kinds of copied audioware for both platforms. Their RSS feeds will alert you to new posts. Its out there and virtually unstoppable. Its funny that pirates have gone back to basic methods (http) to transfer their files when in the late 1990s, specialized server/client software dominated (Hotline).

Its possible that the DMCA inadvertently protected the third party download sites. As long as they allow a takedown notice they should not be subject to major interruption. Its probably hard to track down the original uploader if the site was in another country as well. Pirates are still annoying to some of the original programmers. The original publishers can submit takedown notices to google and possibly these blogs, but other search engines, like Bing still function for shady files.

Speed can be a problem. Most of these 3rd party sites are a little bit crippled. None allow for straight downloads, instead making you wait on a timer and enter a captcha. Some sites have premium account tiers for larger sizes. If you are a patient person there will probably be success.The files are usually on multiple sites. The search engine Filestube.com is like the google of RAR and Zip files on sites like rapidgator.com. If you do require speed and large size, torrent sites are still the best speed.

In conclusion it seems like the people doing uploads to torrent sites are n00bs that copied the software from another distributor or companies actively trying to harm downloads. The future of downloads is HTTP and multi-layers of obfuscation.

Saturday, May 4, 2013

Free U-he Diva Presets For Download


NOW FREE!

48 Flabby analogue tones.

Motorcycle Engines w/ Nitrous

Japanese Koto

Jupiter 8

Mini Moog Leads

Analog Basses

Plucks & Arp sounds

Italo Disco.

TB-303s

Pads

Roland Inspired Inits.

Hardcore Distortions & new effects setups.

Ready to play.

All quality sounds will take you into new sonic territory!


This demo uses 8 instaces of Diva. No channel effects were used! Drums courtesy of Apple Loops.

Link: Download Diva Presets (99k)

Thursday, May 2, 2013

Roland (Cakewalk) A-300 Pro Mini-Review


This is the best off-the shelf midi keyboard controller under $500 in my opinion. The A-300 Pro is a solid, no-headache deal. Its not plug & play (requires a software driver), but its impressive. The key action is a steep improvement from the terrible M-audio Axiom Pro, and possibly Novation Remote (which was heavier and louder ). Ergonomically everything is laid out very well and will cause no headaches or mis-triggers. Menus are not hard to navigate, thankfully . The drum pads are acceptable and trigger fast, as well as light up. While Roland could create a keyboard thats only slightly more professional, with JP-80 level keys, it would end up too heavy for your lap. I found the keys translated to other Roland key-beds. This series of controllers by Roland is probably your best bet today. You won't have any regrets with the A-300 if you like to play and need a semi-compact setup.

Rating: A-

Monday, April 22, 2013

(8) Best Plugins For 2013


1. Korg Monopoly  Korg Monopoly is a great option for subtractive synthesis. I like it much better than Diva. It has better presets, more presets, better CPU economy, and doesn't give you that paranoid feeling you get when you've been synthesizing too long. Something about the filter & overall character is much more agreeable.) Go with Korg. With the Monopoly software you can crank the resonance all the way and not feel "disturbed." Korg has better effects too.

cyclopfx

2. Cyclop This is the best bass synthesizer. It has the modern tone most people are looking for. There is a somewhat steep learning curve, with odd control labeling, but its worth using. There is not another plugin on the Mac thats quite like it. It is much better than NI Massive.


3. Heel Audio Mix Ref

This is a free Mac OS X plugin that is basically a speaker emulator. If you need to tame a sound or check an entire mix this gives you a virtual reference.

amplitube-3-pedal

4. Amplitube 3

This classic plugin suite has so many good effects and amp simulations. Its a must have for any producer. The stomp boxes are useable, even with the rest of the chain bypassed.

addictivedrums

5. Addictive Drums XLN

A very good interface for creating your own customized drumset. If you have no room to record drums this is your best option. The samples are very responsive. The level of control is very good.

toontrackmusic_Ezmix2

6. Toontrack EZ Mix

If you have no idea what you are doing, and don't want to screw around with FX, this is an easy and fast solution. Its also a decent deal. Everything is labeled and it can make you more creative in record time. The level of FX control is not deep, but its not supposed to be. All the presets generally sound good. You don't need to learn a mixing tutorial with this plug.

oxford_inflator

6. Oxford Sonnox & Inflator

Great compression and mixing plugins. They make everything you run through them sound "better."

izotope-ozone5-1-460-80

7. Izotop Ozone

I still use this for mastering when time is tight. The presets provided get you 80% of the way there, and with a little tweaking, make your mixes sound more commercial.

51_main

8. SoundToys & Filterfreak

A fun set of filters & effects that provide a wild character. Sounds Great.

9. Channel 3

This is mixer / channel emulator designed to replicate expensive consoles. Its kind of an audio exciter or EQ? It puts a nice touch on your sound. It is Free.

10. Elysia MPressor.

This is an excellent plugin for drum compression & pre-master effects. It can do the Daft Punk Homework fast attack and bring up the detail in your sounds.

11. Waves L3 Ultramaximizer. By far the best audio limiter for an extreme sound.

12. PSP Vintage Warmer Plugins Another must have for the end-chain in your mastering arsenal. This plugin inflates the stereo field and bumps bass.